C# Advent 2021 - Using C# Code in Power Automate
This post is my contribution to the C# Advent 2021.
Power Automate has a fantastic feature in preview that lets you add some C# code to your flows. It requires using a custom connector, so it’s limited to those with a license that allows that. There are also a number of other limitations which I’ll get into later. But it’s a start.
Yeah, I know, if you want to use C#, why not use a Logic App or Azure Function? And that’s perfectly all right (and for production apps I’d go that route right now). But this is cool, so why not? I’ve blogged before about creating custom connectors in Power Automate. I glossed over the Code tab in that post, but now it’s time to return to it.
Set Up Your Custom Connector
We’ll follow a similar process to what we did before to create a new custom connector. Refer back to that previous post for more details. But on the Data => Custom connectors menu selection we’ll select “New custom connector”. We’ll choose the “Create from blank” option.
Give it a name and add the other options as appropriate. One thing is that you’ll need to provide a host name. If your only purpose is to be able to run some C# code, it doesn’t matter what you put in here as you’re not actually going to be making any calls anywhere. It just has to be a valid domain name. Leave Security as “No authentication” and go to Definition.
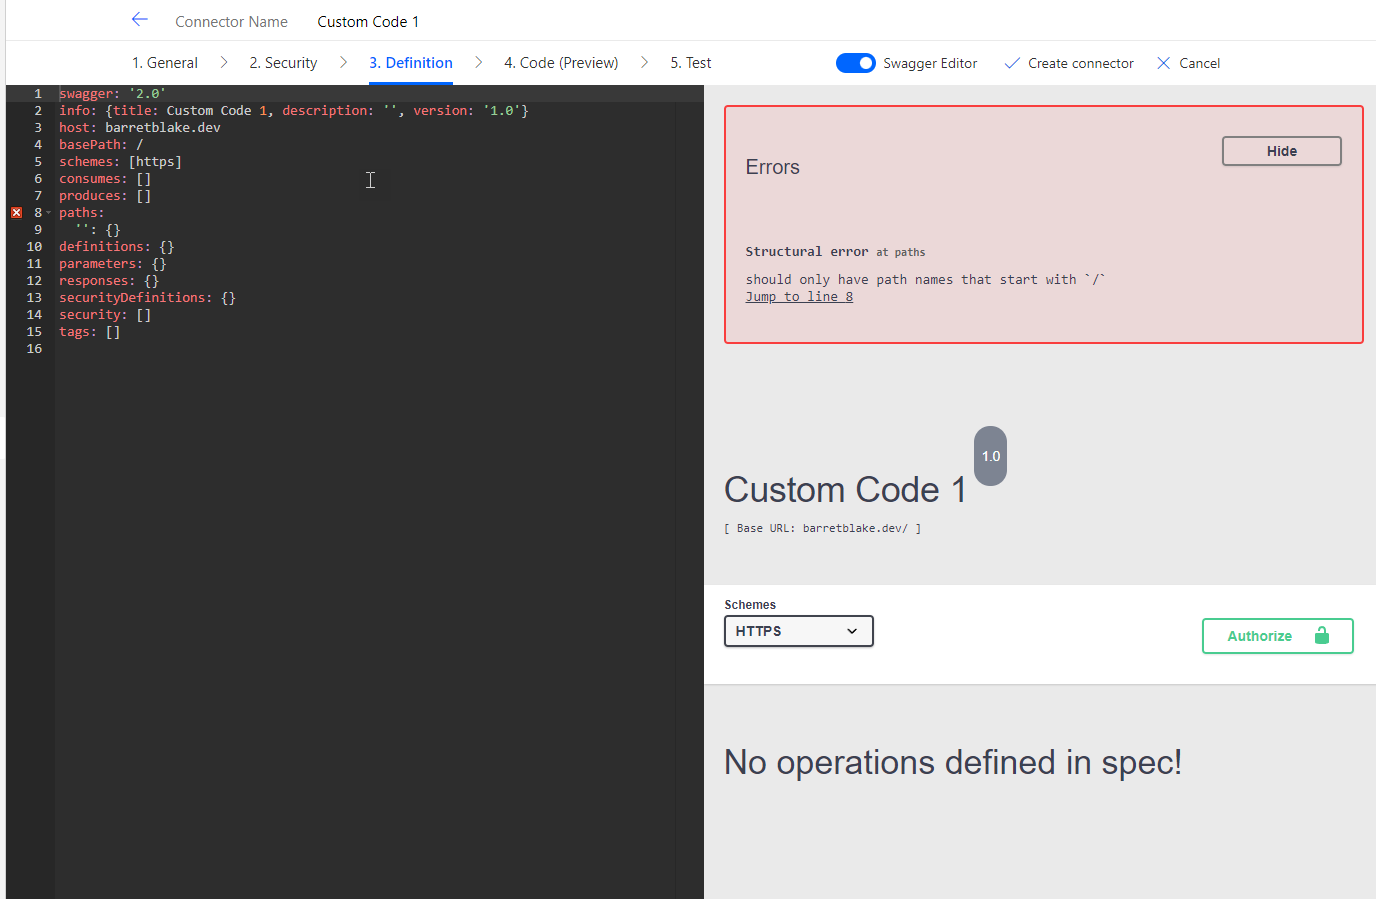
In my previous blog post, we added our endpoints using the user interface. This time, I’ll show you how to define your endpoints using the Swagger editor. There is a toggle at the top right called “Swagger Editor”. Turn that on and you’ll see a screen like the following on it.

flow-custom-code-swagger-editor
The error is because we haven’t defined any actions just yet. In the “paths” section we’ll add the endpoint for our custom code function. Something like the following:
paths:
  /:
    post:
      responses:
        default:
          description: default
          schema: {type: string}
      summary: Convert Fahrenheit To Celsius
      operationId: TempFarToCel
      parameters:
      - name: ftemp
        in: body
        required: true
        schema: {type: string}
      description: Converts Fahrenheit to Celsius
This block defines one endpoint, called ConvertFahrenheitToCelsius that takes a string parameter and returns a string response. (Yeah, I know temperatures are numbers, but it’s easier to pass things as string with HttpContent). We can leave the rest of the swagger code as is.
Writing Your Code
At the bottom, go ahead and click on the button to take you to the Code step. You’ll see in the box a sample piece of code to use as a starter. We can either edit the code directly in this box or we can write it in our favorite C# editor and then paste the final code into the box or upload our code file.
There are a few restrictions. You must put your code in a single class called Script which inherits from ScriptBase. Your code must implement an async Task method called ExecuteAsync. Your code can’t be larger than 1MB in size. And your code must execute in under 5 seconds. And the following are the current list of supported namespaces:
- System;
- System.Collections;
- System.Collections.Generic;
- System.Diagnostics;
- System.IO;
- System.IO.Compression;
- System.Linq;
- System.Net;
- System.Net.Http;
- System.Net.Http.Headers;
- System.Net.Security;
- System.Security.Authentication;
- System.Security.Cryptography;
- System.Text;
- System.Text.RegularExpressions;
- System.Threading;
- System.Threading.Tasks;
- System.Web;
- System.Xml;
- System.Xml.Linq;
- System.Drawing;
- System.Drawing.Drawing2D;
- System.Drawing.Imaging;
- Microsoft.Extensions.Logging;
- Newtonsoft.Json;
- Newtonsoft.Json.Linq;
Other than that, you can write what you want into the Script class, including whatever functions you want. For our sample, we’ll keep it simple and just enter the following code:
public class Script : ScriptBase
{
    public override async Task<HttpResponseMessage> ExecuteAsync()
    {
        HttpResponseMessage response;
        var content = await this.Context.Request.Content.ReadAsStringAsync().ConfigureAwait(false);
        var far = Convert.ToDouble(content);
        var cel = (far - 32) * 5 / 9;
        response = new HttpResponseMessage(HttpStatusCode.OK);
        response.Content = new StringContent(cel.ToString());
        return response;
    }
}
You can find more information on the Script class and how to write it on the Microsoft Docs site.
The last two things we’ll need is to turn on our code. At the top right of the editor is a toggle called “Code Enabled”. Turn this on. Below that and just above the code editor is a dropdown. In that dropdown you can select which of the endpoints this code runs for. If you don’t select any endpoints, then the code runs for all endpoints in that custom connector. Just remember, for every endpoint that you select. the code file overrides the call to that endpoint. So, unless your code calls the endpoint itself, no outbound calls will occur. One other thing: You can only have one script file per custom connector. You can’t create multiple script files (i.e. a different script for each endpoint).
For our demo, it doesn’t matter as we only have the one endpoint. But, if you wanted to support custom code across multiple endpoints with different functionality for each, it is possible. You just need to make sure that your code addresses all of the endpoints you have defined. The way that you implement that is to check the OperationId in your ExecuteAsync entry point. Then, based on the OperationId, you respond as appropriately for each one. Example:
public override async Task<HttpResponseMessage> ExecuteAsync()
{
    // Check if the operation ID matches what is specified in the OpenAPI definition of the connector
    if (this.Context.OperationId == "TempFarToCel")
    {
        return await this.HandleTempFarToCel().ConfigureAwait(false);
    } else if (this.Context.OperationId == "TempCelToFar)
    {
        return await this.HandleTempCelToFar().ConfigureAwait(false);
    }

    // Handle an invalid operation ID
    HttpResponseMessage response = new HttpResponseMessage(HttpStatusCode.BadRequest);
    response.Content = CreateJsonContent($"Unknown operation ID '{this.Context.OperationId}'");
    return response;
}

private async Task<HttpResponseMessage> HandleTempFarToCel(){
    //code here
}

private async Task<HttpResponseMessage> HandleTempCelToFar(){
    //code here
}
If you’re big on separation of duties across files, then this may annoy you somewhat.
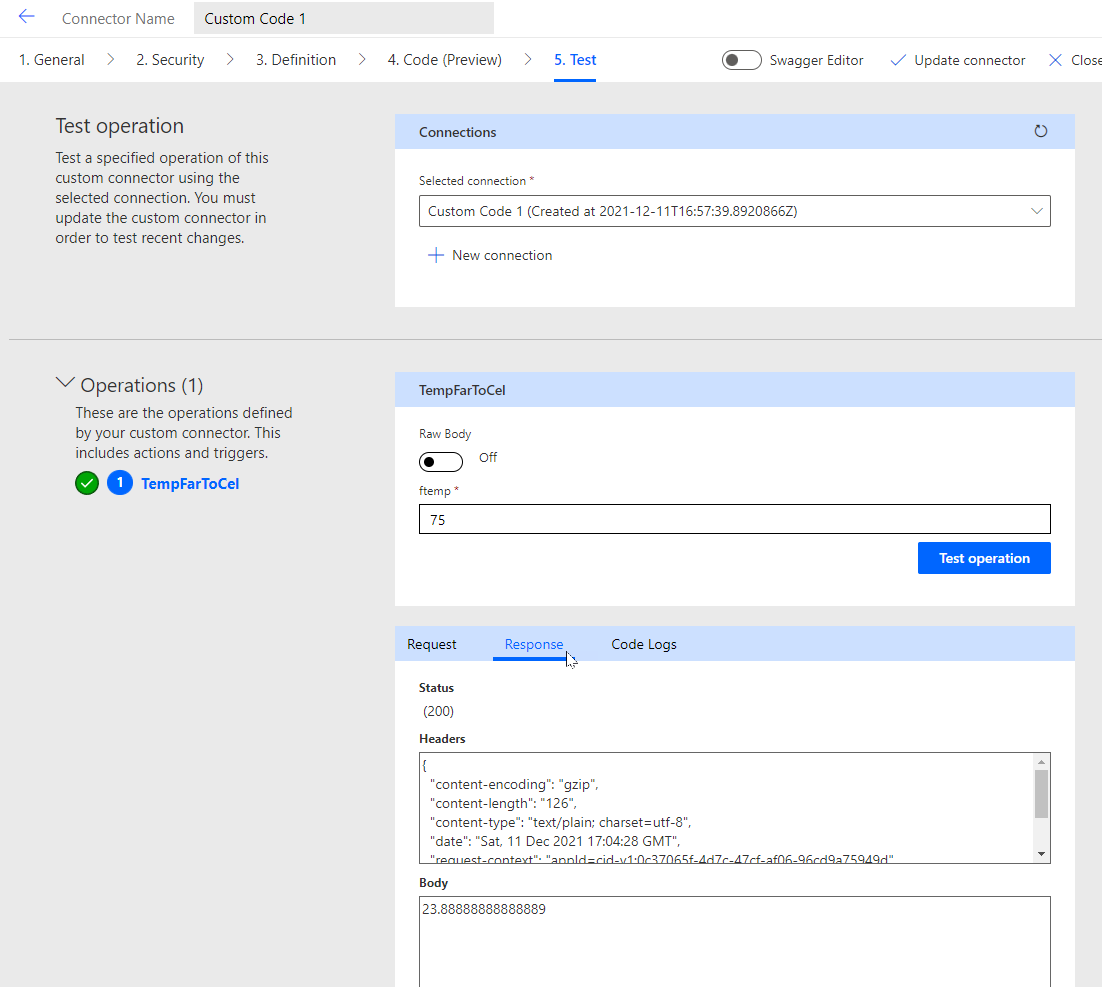
Once you’ve added your code, go ahead and click on the Test tab, and then click “Create connector”. This will create your connector and compile your C# script. Once it’s complete, you’ll be able to test your endpoint. As before, you’ll need to create a new connection first if this is the first time you have built your custom connector. Click on “New connection” in the upper box. If you have created a connection for this connector previously, just select the one you want to test with. Once that is finished, you can now test. For our demo, we’ll enter a Fahrenheit temperature in the box and click “Test operation”.

flow-custom-code-final-test
Now it’s a simple matter to implement into our flows. You can check my previous post on how to do that. When our flow calls the action in the custom connector, our C# code will run and it will return its response.
Conclusion
This could potentially be a really cool feature for Power Automate. The limitations, especially only allowing a single script file per custom connector, instead of per endpoint, will prevent anything too major being implemented by this process. But really, if you want something that in depth, you’re better off with Logic Apps or Azure Functions anyway.
Still, there’s a lot to like about this capability. And for small, quick functions that can add features that Power Automate doesn’t already have, it’s a great feature to be added. So go forth and add that C# code to your flows!

