Error Handling with Power Automate
One of the things in Power Automate that doesn’t seem to get a lot of attention is the available features for error handling. So today we’re going to delve into the kinds of features and design patterns you can use to help your flows run smoothly, even when things go wrong.
After Action Failure Branching
The most basic feature available is after-action failure branching. Normally a flow passes from trigger to action to action and so forth in a more or less straight line. There are actions such as the condition action that let you take different branches based on some condition. But one of the features of Power Automate lets you use that same concept to take a different pathway based on whether the previous action succeeded (the default) or failed.
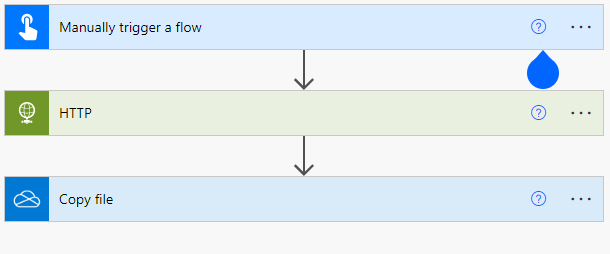
Let’s take the following basic flow:

A basic 3 step flow
It’s a simple example with 3 steps: Trigger => HTTP call => copy file. Let’s say the HTTP call fails and returns a 500 error of some sort. Left as it is, should that occur, the Copy file step will never run and we’ll eventually get an email somewhere that tells us “one of our flows has failed”. But what if this is some high-priority task and an “eventual” error email isn’t good enough? That’s where a failure branch can come in handy.
When you mouse over the arrow in between actions, a plus symbol will appear. If we click on the symbol, we have two options to select from. The first is “Add an action”. The second option, “Add a parallel branch” is the one we want to select.

Add a parallel branch
This lets you create a new branch that will be parallel to your original branch. Left with the default setup, both of these branches will run after the previous action. However, we can change that setup so that one of the branches only runs if the previous action has failed.
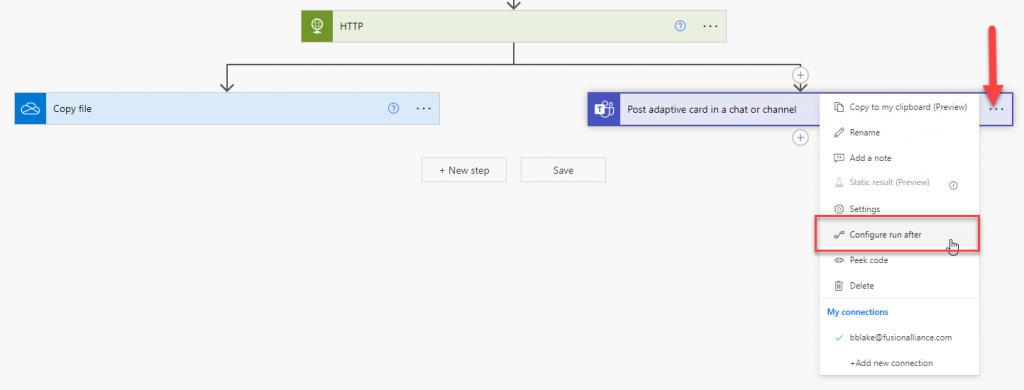
Select the ellipses (the three dots…) for the first action in that parallel branch and select the option that says “Configure run after”.

Configure run after option
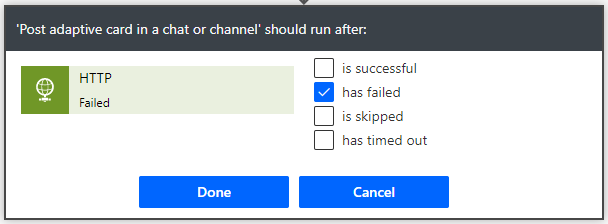
In the dialog that appears, unselect the “is successful” option and select the “has failed” option. Click Done. This will tell the flow that this action, and any that follow it in this branch, should only execute if the previous action (HTTP in this case) has failed.

Select the has failed option
This process comes in especially handy when you’re iterating over a number of records in a loop. If any of them fail, the loop will complete processing all the records, but will be considered as failed and won’t go on to the next action. If, however, you want it to go on regardless of how many succeeded and how many failed, you can select both “is successful” and “has failed” and the flow will move on to the next step after the loop is completed.
Retry Policy
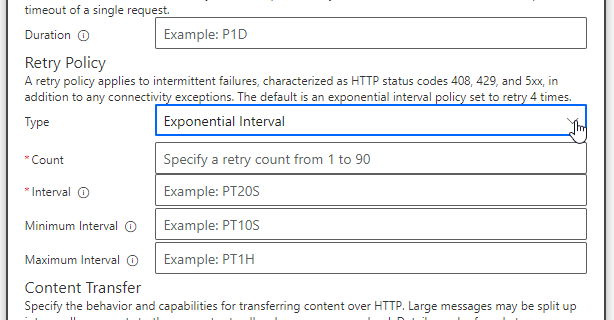
A number of actions in Power Automate allow you to select a retry policy. The exact options for the policy will vary based on the action that supports it. For those actions that support a retry policy, you can find it by selecting the ellipsis menu toggle for the action and selecting “Settings”.

Retry policy dialog box
Let’s look at the HTTP action as an example. The HTTP action provides 3 options for retry: None, Exponential Interval and Fixed Interval. For exponential, you tell it how many attempts to make (up to 90) and what the interval between each attempt should be in ISO 8601 format. For example, PT10S would tell the flow to wait 10 seconds after the first attempt fails before trying again. And with each successive failure, the flow would wait longer than the first time. Typically the wait time will double between attempts. 10 seconds, then 20 seconds, then 40, and so on with each successive failure up to the maximum interval and/or number of attempts defined.
Fixed interval works almost the same way, except that the interval is the same between each attempt. 10 seconds, then 10 seconds, then 10 seconds, and so forth.
Scope
One of the downsides of these first two options is that they are limited to the result of a single action. But what if you want to have a single error-handling method for a group of actions? Enter scope.
The scope action lets you collect a group of actions together into a single block. The scope action inherits the result of all the actions contained within, be it Succeeded, Failed, or Cancelled. This allows you to have just a single, all-or-nothing error-handling process for that group of actions.

The Scope action
By using scope you can create a sort of pseudo try/catch process for your flows. It isn’t as complete as a full development language try/catch would be, but it’s better than nothing.
Conclusion
We can see that Power Automate provides some quite useful methods for adding error handling to your flows. It can take a bit of planning to ensure you implement it well. But in the end you’ll find it comes in quite handy for keeping your flows running smoothly with the ability to handle things when it all goes wrong.

