

Barret
Friday, June 27, 2025 | 5 minutes
Using a Separate EF Core Data Project in .NET Aspire Solutions
It isn’t completely straightforward how to use a separate database migration project when you’re developing using the .NET Aspire framework. But just by following a couple of setup steps, it can be pretty easy to use a separate data project for your DbContext and EF Core migrations. In short, when you’re developing with Aspire, the AppHost project is the startup project. By adding a couple of parameters to our Add-Migration and other ef commands we can easily make it do what we want. Let’s take a look at an example.
Base Project Setup
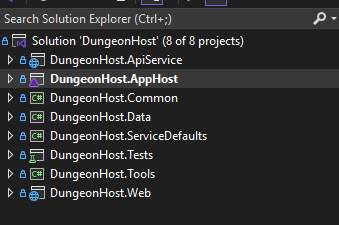
In the following example, I’ve got a solution with several different projects.
I won’t cover how to set up Entity Framework Core in our .NET Aspire solution as I’ve covered this in other posts and videos on my YouTube channel. For what we want to accomplish today, the two key projects are our DungeonHost.ApiService project and our DungeonHost.Data project. The Data project is where we will house our DbContext and our migration files. And the ApiService project is where we are going to execute our Add-Migration commands and apply our database changes in our development environment.
Let’s start by looking at the structure of our Data project.
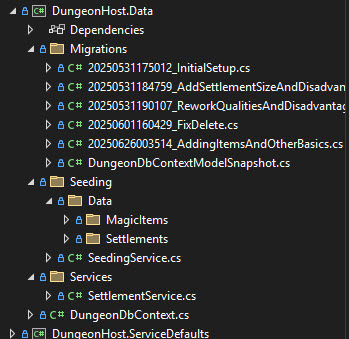
You can see from this is a pretty standard data project structure. We’ve got a folder for our generated migrations file, a folder to hold our data seeding class files, a services folder to house our data service classes, and a DbContext file. It’s all pretty straightforward for any project that makes use of Entity Framework. And there’s nothing special about it aside from the fact that it’s a separate project in our solution instead of being in our Api project as we might do for the most basic applications.
But what happens if we want to add a migration with our basic Entity Framework setup in Aspire? Well, let’s open the Package Manager Console and run the command:
Add-Migration TestMigration
We get the following error:
Your startup project 'DungeonHost.AppHost' doesn't reference Microsoft.EntityFrameworkCore.Design. This package is required for the Entity Framework Core Tools to work. Ensure your startup project is correct, install the package, and try again.
Hmm. Well, that’s not going to work. We could add the Design and Tools libraries to our AppHost, but that’s not the approach I want to take. There’s a couple of reasons for that. For one, we generally want to keep the AppHost project limited to project configuration that we need during development. The AppHost doesn’t get deployed to the server. At least, it shouldn’t. In fact, AppHost really shouldn’t be deployed anywhere. It should be just for our local development efforts. The ApiService, on the other hand will serve as our core application for our deployments. And we want to employ database migrations and seeding on our servers, as well as our local environment. Let’s walk through how to set that up and how to run our Add-Migration commands.
ApiService Project Setup
First thing we need to do is prep our ApiService project for our migrations setup. We’ll add the two standard ef libraries that we’ll need for this.
Microsoft.EntityFrameworkCore.Design
Microsoft.EntityFrameworkCore.Tools
Next, add a reference to our Data project to our ApiService project so it can see the DbContext file. Then, in our Program.cs file, we’ll add a couple of things:
builder.AddNpgsqlDbContext<DungeonDbContext>("dungeondb"); //This adds our reference to our DbContext

...

using (var scope = app.Services.CreateScope())
{
    var context = scope.ServiceProvider.GetRequiredService<DungeonDbContext>();
    var strat = context.Database.CreateExecutionStrategy();
    strat.Execute(() => context.Database.Migrate());

    var seed = new SeedingService();
    seed.SeedSettlements(context);
}
Let’s talk about what’s inside the using block. What we’re trying to accomplish here is twofold. First, we want to run our migrations to ensure our database schema is up to date. Once the schema is up to date, we want to run our seeding service to ensure that any preloaded data that we need is in place in our database. In order to do this, we first need an instance of our app scope. That’s the using part. Next, we get a reference to our DbContext in that scope. Once we have a context, we tell the application that we want to set up an execution strategy and run the Migrate command in that strategy. This essentially does the same thing that running the Update-Database command will accomplish from the command line, but within the application. This let’s our ApiService project ensure all migrations have been run as part of the startup process. And finally, we run our seeding service which just checks the existing seed data and adds anything missing.
I should note here that the .Migrate command will throw an exception the very first time it runs. The reason for that is that it first checks the database Migrations table to get the list of previously run migrations, as ef does. The problem is that if this is the first time it gets run, that table doesn’t exist yet and it will try doing a SELECT command on a table that doesn’t exist. It’s a minor issue, and as I said, only occurs the very first time this is run against the database, so it’s not a big deal.
So, now our ApiService is set up. So, what do we need to do to run our Add-Migration commands when we make an update to our DbContext? It’s pretty straightforward. We just need to add 2 parameters to our command line to tell it what to do. First, we add:
-Project
This tells it the project to put the migrations in and where our DbContext is. The second parameter is:
-StartupProject
This tells the command that instead of using our solution defined startup project of AppHost that Aspire uses, we instead want to to use a different project. So, our full command would be:
Add-Migration <MIGRATION_NAME> -Project <DATA_PROJECT_NAME> -StartupProject <START_PROJECT_NAME>
or with a full example
Add-Migration AddSpellbookToProject -Project DungeonHost.Data -StartupProject DungeonHost.ApiService
Run this command and we get a new migration named AddSpellbookToProject.cs in our Data project Migrations folder.
Conclusion
It’s pretty easy to create a separate data project, complete with context and migrations in our Aspire projects. And, with a little effort, ensure that when we deploy our code to servers, it can handle it’s own migrations and seeding, making our life a whole lot easier.
