
Barret
Thursday, February 12, 2026 | 7 minutes
Getting Started with .NET Scheduling in Hangfire
Scheduling tasks in .NET is a lot easier these days. While scheduling libraries have been around a long time, the options available today are better than ever. We’re going to take a look at one of the available libraries: Hangfire.
Getting Started
The first thing we need to do is import the needed Nuget packages. Hangfire, like most of these scheduling tools, keeps track of the tasks that need to run in some kind of datastore. It might be a database, like SQL Server, or a cache service like Redis. For our walkthrough, we’re going to make use of SQL Server to back the Hangfire service. We’re also going to use an ASP.NET Core Web API application as our .NET application. But like most of these services, it can run in pretty much any .NET application: A web app, a console app, a Windows app, a Windows service, or anything else.
Create an ASP.NET core web API application and the following Nuget packages:
- Hangfire.Core
- Hangfire.AspNetCore
- Hangfire.SqlServer
- Microsoft.Data.SqlClient
Next, go to your local SQL Server instance, maybe SQLExpress or whatever you’re using, and create an empty database. We’ll just call it Hangfire. No need to add any tables. Hangfire will create the tables it needs.
Next, we’ll add a connectionString to our appsettings.json file to hook up our database:
  "ConnectionStrings": {
    "HangfireConnection": "Server=(localdb)\\mssqllocaldb;Database=Hangfire;Integrated Security=SSPI;"
  },
The next step is getting the Hangfire service set up and running in your application. In the Program.cs of our web app, we’ll add the following bits of code:
// Add Hangfire services.
builder.Services.AddHangfire(configuration => configuration
    .SetDataCompatibilityLevel(CompatibilityLevel.Version_180)
    .UseSimpleAssemblyNameTypeSerializer()
    .UseRecommendedSerializerSettings()
    .UseSqlServerStorage(builder.Configuration.GetConnectionString("HangfireConnection")));

// Add the processing server as IHostedService
builder.Services.AddHangfireServer();

...

app.UseHangfireDashboard();
The Services sections will set up the Hangfire service and get it running. The app.UseHangfireDashboard will set up the dashboard that you can use to monitor the running services. We’ll get to the dashboard in a minute, but first let’s take a look at the datastore that backs the service up.
Datastore
Hangfire can make use of either a database like SQL Server, or a caching service like Redis. When it uses a database, it will create a set of tables that look like the following:
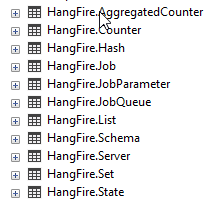
Each of the various tables stores information about the server and jobs:
AggregatedCounter: Stores aggregated counter values, typically for statistics.Counter: Stores simple, raw counter values related to job processing.Hash: Stores key-value pairs of various data, used for job state and configuration.Job: The core table containing definitions and details of all background jobs.JobParameter: Stores serialized parameters for each job.JobQueue: A queue for jobs that are ready to be processed by the Hangfire server(s).List: Stores lists of data, often used for retry queues and other internal lists.Schema: A small table that holds a single integer value indicating the current schema version (e.g., version 9 for recent releases), used for migration management.Server: Contains information about the active Hangfire server instances connected to the database.Set: Stores sets of unique values, such as recurring jobs, set of failed jobs, etc.State: Records the history of state changes for each job (e.g., Enqueued, Processing, Succeeded, Failed).
The three important tables are JobQueue (future jobs), Job (current and past jobs), and State (what happened with each job). If you’re curious about the process flow, these are the important ones to watch.
Dashboard
Once your application is running, you can access the dashboard at the [[SERVER]]/hangfire URL. The Hangfire dashboard gives you real-time and historical insights into the scheduled processes running in your application. On the main dashboard screen, you get a running graph of real-time events and a historical graph of the last 24 hours by default, as well as some details about traffic.
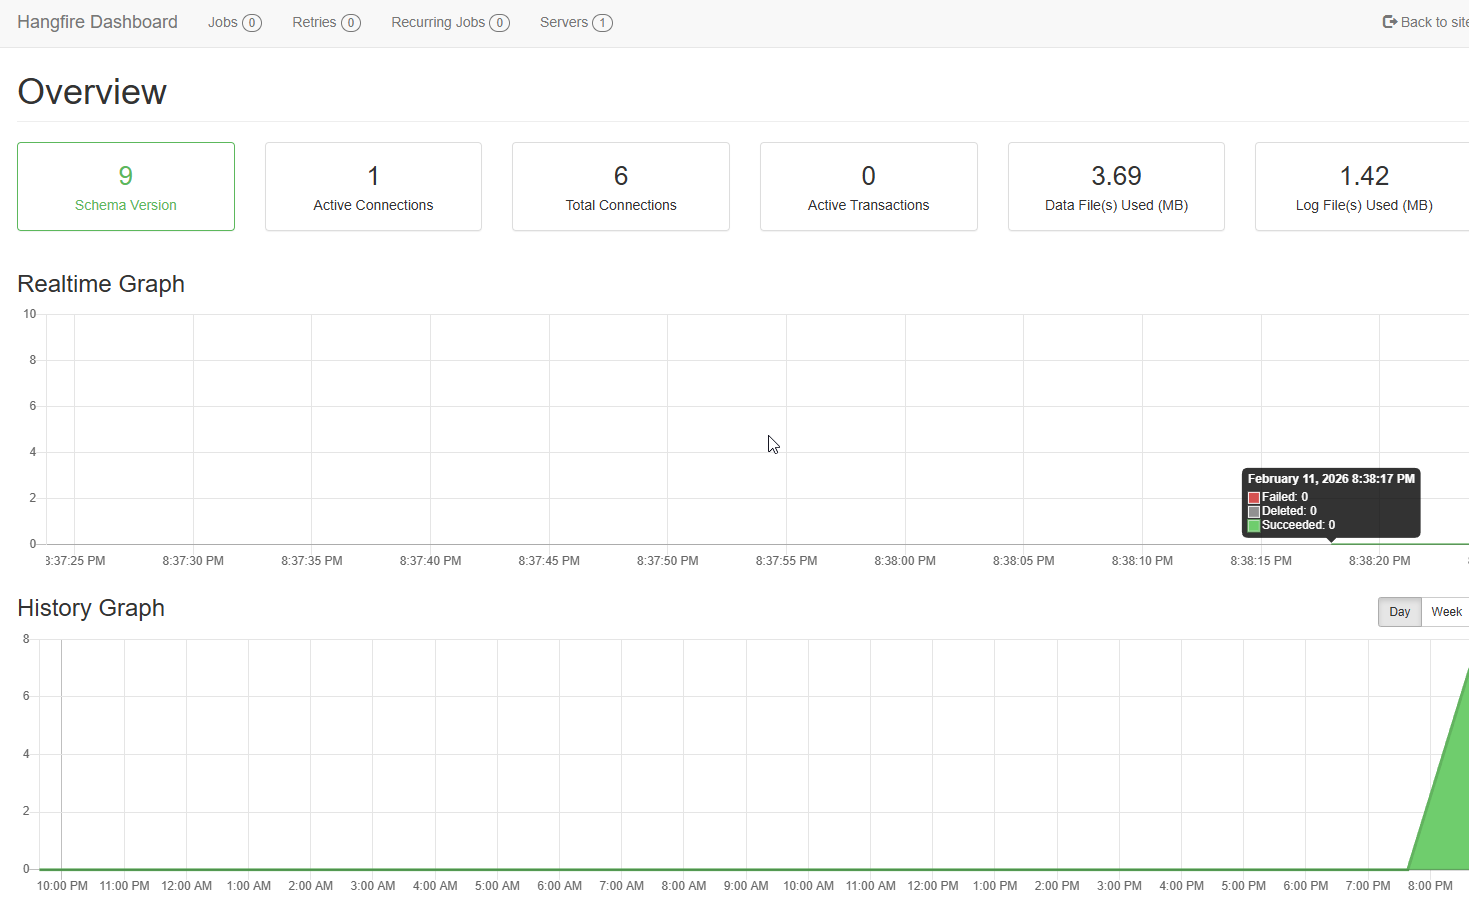
There are also several menu items across the top.
- Jobs: Lets you look at more detailed information regarding jobs that have run, including jobs in the queue, jobs scheduled to run later, jobs currently running, jobs that successfully finished and failed jobs.
- Retries: If a job had to be retried, it will show here
- Recurring Jobs: You can schedule jobs to run over and over again. Those will show up here.
- Servers: If you are running multiple instances, you can get details of each of those here.
The last time highlights one of the great things about these services. You can have multiple servers running in partnership. You just point them all at the same datastore that holds all of your information about scheduled and running jobs.
The detail you can see regarding various jobs can provide you with a great many details about those jobs. For instance, if we have created a simple endpoint to write a message to the Console, we will see information in the dashboard about that job:
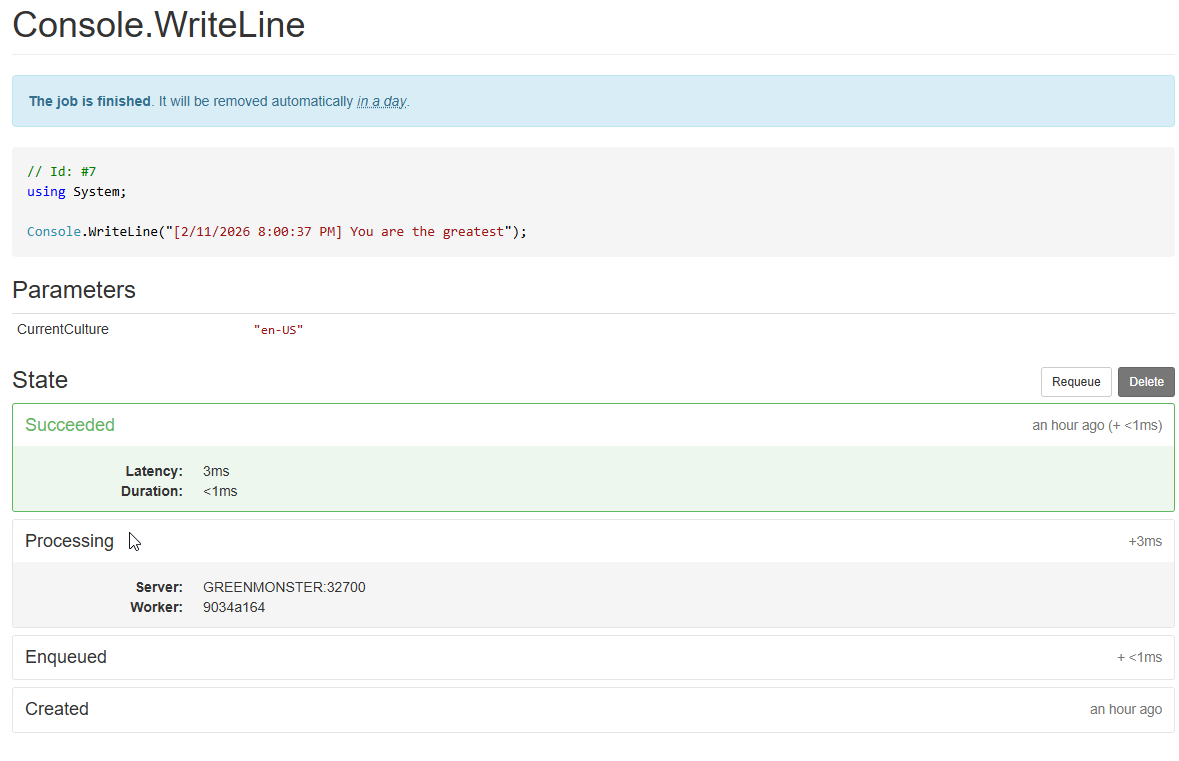
As you can see, this can provide a lot of useful information about the job and what happened with it.
Jobs
Creating a job is easy. For the output we see above, our endpoint looks like this:
app.MapPost("/addjob", (string? message) =>
{
    var jobMessage = message ?? "Hello from Hangfire background job!";
    var jobId = BackgroundJob.Enqueue(() => Console.WriteLine($"[{DateTime.Now}] {jobMessage}"));
    return Results.Ok(new { JobId = jobId, Message = "Background job enqueued successfully" });
})
.WithName("AddJob");
There are several types of jobs that we can create.
Fire-and-forget
These jobs execute immediately, once, and that’s it. There is no further action after they occur.
BackgroundJob.Enqueue(()=> MyFireAndForgetFunction());
Delayed
These jobs execute once, but after a certain amount of time. For instance, let’s say that I started some task and I want to check back later to see the result of that task, and then decide what to do then. A delayed task is perfect for that.
BackgroundJob.Schedule(()=> MyDelayedTask(someParameter), TimeSpan.FromHours(1));
This would schedule MyDelayedTask to run in one hour.
Recurring
Recurring jobs occur over and over again on some sort of established schedule. It could be once an hour, once a day, or some other schedule. These schedules use the standard CRON format to define the schedule. This can either be in string format (i.e. “*/5 * * * *” would run every 5 minutes) or by using the predefined Cron expressions (Cron.Hourly).
RecurringJob.AddOrUpdate(()=> MyRecurringJob(), Cron.Hourly);
Continuations
Continuations are jobs that are scheduled to run whenever a predecessor job has completed. For instance, you may want a job to trigger a cache reset after a database update completes. To do this, you need the job ID of the predecessor task.
var jobId = BackgroundJob.Enqueue(()=> myFirstJob());
BackgroundJob.ContinueJobWith(jobId, ()=> myFollowupJob());
Batches and Batch Continuations
A batch is a group of jobs that are grouped together. The most common use of this is to set up continuation jobs to run after the batch is completed.
var batchId = Batch.StartNew(x=> {
  x.Enqueue(()=> Job1());
  x.Enqueue(()=> Job2());
  x.Enqueue(()=> Job3());
});
Batch.ContinueBatchWith(batchId, x => {
  x.Enqueue(()=> Job4());
})
Remember that each batch group may run in parallel, and not necessarily in any particular order. So if the jobs are dependent on each other, you’ll need to make them in separate batches or continuations.
Background Process
These are jobs that you want to run continuously in the background of your application. These are not scheduled or enqueued. They start when your application starts and they just keep running over and over and over again. These are defined as classes that implement the IBackgroundProcess interface. Adding that interface will ensure that class gets added to the background processes for your application.
The class must implement the Execute function. This function will be run over and over and over again. So if you want a pause between executions, add a .Wait call to the context.
public class MyBackgroundProcess : IBackgroundProcess
{
  public void Execute(BackgroundProcessContext context)
  {
      // run some tasks and do some jobs

      context.Wait(TimeSpan.FromHours(2));  //pause for 2 hours before ending the function
  }
}
If the background job fails, Hangfire will try again after a certain amount of time.
Retries
The automatic retries don’t just apply to the background processes. Any of the other jobs will also be retried automatically. It won’t remove a job until that job successfully completes. You can also define the maximum number of attempts Hangfire will make before marking a job as failed.
[AutomaticRetry(Attempts=10)]
public static void MyJob() {}

BackgroundJob.Enqueue(()=> MyJob()); //Hangfire will try this up to 10 times. If it fails 10 times, Hangfire will give up and mark it as failed
Conclusion
Hangfire is just one of the toolsets out there that let you schedule jobs and processes in your .NET applications. It’s free for a lot of the features, but they also offer a Pro paid tier that adds some additional features. I’ll look at some additional features in a future post.
